viernes, 28 de marzo de 2014

The Sports Bag.


¡¡Por fín una bolsa de deporte a mi medida!!
Después de pasear arriba y abajo una bolsa medio destrozada de Kellogs, y otra del año de maricastaña, creo que ya era imperativo que me hiciera una bolsa medio decente. 
En mi  mercadillo hay lonetas estampadas a porrillo (ahora, no pidais estampado fino, majas, todo así a lo bestia) y al ver esta de las "converse" ya no lo pude dejar pasar. Era el destino que me decía: hazte la bolsa, hazte la bolsa...o igual no era el destino y era CHARO, que en cuestión de bolsos es la que corta el bacalao.

At last, a sports bag that fits my needs!!
After using assorted commercial bags (the one from Kellogs was not that bad) or really old ones, it was imperative that a sewist like me would make one that she didn´t have to hide from the sight of the world.
There are a lot of print canvas fabrics at my local market (don´t look for delicate, small prints though. It is all big and bright!) and when I saw this Converse print, I just couldn´t ignore it. I don´t enjoy making bags. I love the creations from this lady CHARO, she is a master, but I dont feel comfortable sewing 90º angles.


La podía haber acolchado como sugería el patrón, aunque creo que mi cupo anual ya lo he cubierto con ESTE/THIS. Solo he entretelado la parte de abajo hasta donde empieza la cinta. Eso sí, una entretela de las más tiesas que he visto nunca. El fondo lo he reforzado también con doble capa de goma eva.

In the pattern they suggest to quilt the fabric, but I already covered my annual quilting with ESTE/THIS other bag. I interfaced the bottom and sides up to the point where the strap starts. I used one of the stiffest interfacing I´ve know so far. Also I reinforced that area with some rubbery material, I cannot find the English name for it. Something similar would be "Soft and Stable" that I saw in a tutorial HERE


¡Si es que si no caso algo, no soy feliz! Tambien me gusta el detalle de usar dos cremalleras y abrirlo desde el centro y no desde un lado.

I just had to match something, right? I like the use of two zippers meeting at the center, so that you don´t have to open the bag from a side.

El interior. Hay bolsillos dentro. Dos normales y otro con cremallera. Más los dos exteriores. Como contraste usé otra loneta de rayas. En las instrucciones no llevaba bies en las costuras, pero la verdad, yo creo que siempre queda mejor si se lo añades. Para rellenar el bies use una lana gordita que tenía por casa.

Inside: two open pockets and one zippered , plus two outside that makes 5 pockets to loose the keys more efficiently. I used that striped canvas as contrast and even though the instructions didn´t call for it, I added the piping on the seams. I used thick wool to make it.

Poco más hay que decir de este bolso. Os dejo una foto y un enlace de la página del patrón.
Un abrazo a tod@s y nos vemos en unos dias. 
Acordaos: Este sábado cambian la hora. Una menos para dormir...¡O para coser!

Nothing else to say about this one. 
Love to everyone. Thank you always for your kind comments, sometimes I can´t thank you one by one, but I try.
And don´t forget: Next Saturday we´ll set the clock forward. One hour less to sleep...or to sew! :(

B5581

lunes, 17 de marzo de 2014

Just For Men de Telaria: Negroni


Coser para mi marido no es facil. Supongo que no lo es para ninguno en general. Pero esta vez le ha gustado el resultado y solo espero que se ponga esta camisa, porque lleva mucho cariño y atención. Más que cuando coso para mí.

Sewing for husbands is no easy task. At least for me. But this time I think I succeded and he is really happy with his new shirt. He´d better!! I put a lot of love attention into making it. Much more than when I sew for myself!


El patrón es la NEGRONI BY COLETTE PATTERNS y la incluyo dentro de la iniciativa JUST FOR MEN de TELARIA. Hay muchas versiones de esta camisa, en diferentes telas, lisas, estampadas, manga corta, manga larga...Podeis echar un vistazo AQUI/HERE

The pattern is NEGRONI BY COLETTE PATTERNS (I know you´ve recognized it already, but there you go) And I include it in TELARIA initiative JUST FOR MEN. There are plenty of lovely versions out there but here is a link to all those beauties AQUI/HERE

JUST FOR MEN


Yo elegí esta pana suavita y la tela para los detalles , algodón floreado, no me convenció mucho al principio, pero ahora con los botones y el hilo a juego me encanta.

I chose this  grey corduroy and flowery cotton for the facings and detail trying to think "like a man" Gosh, that´s difficult! When I got home I wasn´t very confident that I made the right choice, but once I found those buttons and the matching thread...Love!!


Para construirla seguí las indicaciones del patrón paso por paso, pero para los detalles del topstitching y de la forma de planchar mientra cosía usé los métodos que incluyen la clase 40 TECHNIQUES EVERY SEWER SHOULD KNOW BY GAIL YELLEN

For the construction, I followed Colette instructions religiously but for the details, more specifically, the top stitching, I used what I´m learning from 40 TECHNIQUES EVERY SEWER SHOULD KNOW BY GAIL YELLEN


El interior de la tela casi me gusta tanto como el exterior.
Os dejo con mi foto favorita.
Un beso y feliz semana a todas.

I like the wrong side of the fabric almost as much as the right side.
I leave you with my favourite photo. 
Happy week everyone!!!


viernes, 14 de marzo de 2014

The Inverted Box Pleat Skirt


¡Hola! Aquí estamos otra vez.
¿Ya os había contado que estoy liada con las clases de CRAFTSY? Pues eso.
He echado muchas horas de ver, tomar notas, hacer números (que yo soy de letras, nenas y eso está en pulgadas!) echar lineas, que si el patrón base que si el "sloper" que si el "ease". (Ni idea de como se traduce eso)
Total, que después de unas cuantas muselinas, y dentro del curso de las faldas Patternmaking basics: The Skirt Sloper he hecho esta falda que ya se ha quedado con el nombre "Falda de Profe de Inglés" En realidad es una prueba y usé una tela a la que tengo un poco de manía, pero una vez hecha ¡oye, que me ha gustado! Que me veo yo como muy profesional...

Hello! Here again.
Did I tell you I´m really busy with some CRAFTSY classes? Well, I am.
I´ve been watching carefully, taking notes, taking measures, doing my math, drawing lines, drawing a moulage, a sloper...the works! 
After some muslins and for the class Patternmaking basics: The Skirt Sloper I´ve made this skirt. It even has a name "The English Teacher Skirt". It is really another muslin, made of a fabric I didn´t like much, but once finished I quite like it! It makes me feel very "grown up" very professional! :D


Ni siquiera está forrada, pero he terminado las costuras y el bajo con bies.
Una de las cosas que podían ir mal es que el pliegue quedase abierto cuando estás de pie. ¡Prueba superada!

It is not even lined, but I finished the seams with bias tape.
One of the things that could go wrong was that the pleat wouldn´t close when standing...check!


La costura del medio ha quedado un poco "fuera de hilo" pero es un error de corte. No quise meter la costura para arreglarlo un poco por si me cargaba el pliegue. Recordad que es/era una muselina...

The center seam is a bit off grain. It is a cutting mistake. I didn´t try to fix that sewing it because I thought it would affect the pleat. Remember it is/was a muslin


La vista lateral no tiene nada de especial, pero al llegar a la parte de atras... ¡Horreur! ¿Que son esas arrugas horizontales debajo de la cinturilla?
Y más importante: ¿Porqué pasa eso?

The side view has nothing remarkable but when we get to the back... What it that! What are those horizontal
wrinkles under the waistband?
And most importantly why does that happen?


¿Puede ser que he subido un par de kilos desde que me tomé las medidas? ¿Puede ser que tengo una espalda rara,rara?
Desde aquí os pido ayuda. Si sabeis como solucionar este problemilla, por favor dejadme un comentario, o si no tambien podeis escribirme a merchehan@yahoo.es. 

Can it be that I put a bit of weight (2kg) on since I took my measurements? Can it be that I have a weird back?
I want to ask you for help. If you know how to tackle this problem, please leave me a comment, or you can also e-mail me to merchehan@yahoo.es


¡Aquí  espero vuestros consejos, gracias!

I´ll wait here for your advise. Thank you!

domingo, 9 de marzo de 2014

Shawl Collar Cardigan by Sew, Country Chick!

¡Hola! ¡Cuanto tiempo sin veros! Ultimamente parece que tengo menos tiempo para coser o blogear lo que coso. Entre los cursos de patronaje de CRAFTSY, que son muy laboriosos, y la vida misma, que lo es más, solo me ha dado tiempo a este cardigan y a un disfraz carnavalero para mi niña...y a una Negroni, pero el modelo no encuentra el momento de lucirla, así que habrá que esperar.

Hello! Long time no see! It seems that lately I have less and less time to sew or blog. I´ve been very busy with the pattern-making classes at CRAFTSY, and with life itself. I sewed an indian costume for my daughter, and a Negroni for my husband but there is not photographic evidence of that yet. I also sewed this cardigan for myself.


Total, que cuando ví ESTE/THIS  tutorial de SEW, COUNTRY CHICK!  tan bonito, tan sencillo y estiloso me acordé de esta tela de lana que me había dado mi suegra. Metro y cuarto. Me encantó la primera vez que la ví pero no me daba para lo que quería hacer: un chaquetón para la niña, porque hay que casar los cuadros que igual son demasiado grandes para ella, hay que poner vistas... y ahí estaba la tela, huérfana. Fué ver el Tuto de Justine y saber que ya había encontrado el proyecto perfecto. Y como dentro de poco la niña se va a poder poner las cosas de su madre, no tengo remordimientos, jiji!

When I read ESTE/THIS tutorial by SEW, COUNTRY CHICK! I knew I had to make it! So pretty and stylish, easy and fast, I just had to! Besides, my mother-in-law gave me this kind-of-ethnic fabric a long time ago, 125 cm long or so, I wanted to use it to make a coat for my daughter but there was not enough fabric (you have to match the squares, make facings...) so it was lying there, orphan... I think it was waiting to become just this! And no remorse: soon my daughter will be tall enough to wear it. 


Me gustan mucho los bajos redondeados, las bandas frontales y las "mangas" que yo he hecho más largas que la versión de Justine, para poder recogerlas o bajarlas. No he querido casar las bandas frontales, para que no quedara tan "plano"

I used up all the fabric. I love the round hem, the front bands and the "sleeves" that I made a bit longer so that I can wear them folded or down. I didn´t want to match the front bands, to make them stand out.


También tenía dos botones grandes y bonitos que me dió mi madre y que nunca habían encontrado hogar. Pues ahí creo que quedan estupendos. ¡Y mirad que textura tan bonita tiene la tela!

I also had those two big and pretty buttons my mother gave me and had been in my button-box for four years. They´ve also found a home in this cardigan. And look, what a nice texture the fabric has!


Los bajos los acabé con bies azul, porque quería sacrificar lo mínimo posible el largo. 
Creo que es una prenda perfecta para vestirse "modo cebolla" así en capas, ahora que uno no sabe si se va a asar o a pelar de frio.

I finished the hems with blue bias, I didn´t want to sacrifice the lenght of the cardigan by making a regular hem.
I think this is a great piece for layering, now the weather is getting crazy.


Si teneis ganas de una cosita así, pasaros por  SEW, COUNTRY CHICK!. Las medidas están en pulgadas, pero con un conversor a centímetros, solucionado. 
Pues nada, hermosas, nos seguimos leyendo.
¡Un beso grande para todas las costureras!

If you want something like this and you have a couple of hours to spare, go to SEW, COUNTRY CHICK!
You won´t regret it!!
Lots of love to all my friends and fellow sewists. Spring is around the corner!!

Bolso/Bag - AQUI/HERE

Pantalones/ Trousers - AQUI/HERE

viernes, 21 de febrero de 2014

Carme Blouse by Pauline Alice

EDIT: Find some gorgeous versions  by the stylish KIRSTY of Top Notch

Arriba os dejo con otras preciosas versiones de unas costureras con estilo.


Pauline ya ha sacado su nuevo patrón AQUI y por segunda vez he tenido la suerte de ser su probadora. 
Esta vez se trata de una blusa con todos los detallitos que os podais imaginar. 
Es muy dulce, con el canesú con lorzas, la abertura  polo, el cuello mao, su manga fruncida el en puño...y luego el bajo redondeado típico de las camisas de siempre, el detalle del botón y la trabilla para recoger la manga. Vamos que no le falta de nada.

Pauline´s latest pattern has been released HERE and for the second time I have the honour to be one of her testers.
This time around it is a very pretty blouse with all the little details you can imagine. 
It is so sweet: the tucked bib, the polo neck opening, the gathered sleeve into the delicate cuffs and the placket to keep the sleeve up for a more casual look...Did I miss anything? Oh,yes! The curved hemline :)


Creo que es una camisa muy equilibrada. Yo pensaba que las blusas no eran lo mío. Sin embargo esta ya la he puesto un par de veces cada vez me siento mejor con ella.

I think this is a very balanced blouse... I thought blouses were not "my thing" until I made this up. I wore it a couple of times and I´m getting used to it.


Las instrucciones que incluye Pauline con el patrón son clarísimas y a mi me ha sorprendido muy gratamente lo fácil que resulta con su método hacer el cuello polo, los pliegues, la inserción del canesú. De verdad os lo recomiendo no solo por la blusa en sí, si no porque vais a aprender a hacer todas estas cosas de manera muy clara y sencilla.
De mi cosecha solo añadí las costuras francesas.
Y estoy bastante orgullosa de mis pespuntes. Estoy siguiendo un curso de  CRAFTSY que se llama "40 tecnicas que toda costurera debería saber" de Gail Yellen. Y me está resultando muy util.
En una de mis locuras transitoria me apunté a tres clases más, ya os iré contando...

The instructions Pauline includes in the pattern are really clear and I was very surprised to see how easy it was to make the polo opening and the yoke insertion. I made those before but never found it as easy as per her instructions. The only thing I added were the french seams.
I´m very proud of my top stitching. I´m following this CRAFTSY class by Gail Yellen "40 techniques every sewer should know, and she gives very useful tips for topstitching and many other subjects.
I also enrolled in three more classes, but I´m going very, very slow (I take notes of everything!)


Como veis la blusa es preciosa y se puede alargar para hacer un vestido camisero para esta primavera... ¡Que tentaciones, Pauline!
Ya sabeis que si quereis haceros con este pieza clásica y bonita donde las haya os teneis que pasar por 
CHEZ PAULINE

As you can see the blouse is beautiful and can be elongated to create a spring shirt-dress. I´m so tempted!
So if you want to make this timeless and pretty piece, please visit 
CHEZ PAULINE


¡Me ha enamorado! I´m in love!!
¡Que tengais un buen fin de semana!

Have a great weekend!


lunes, 17 de febrero de 2014

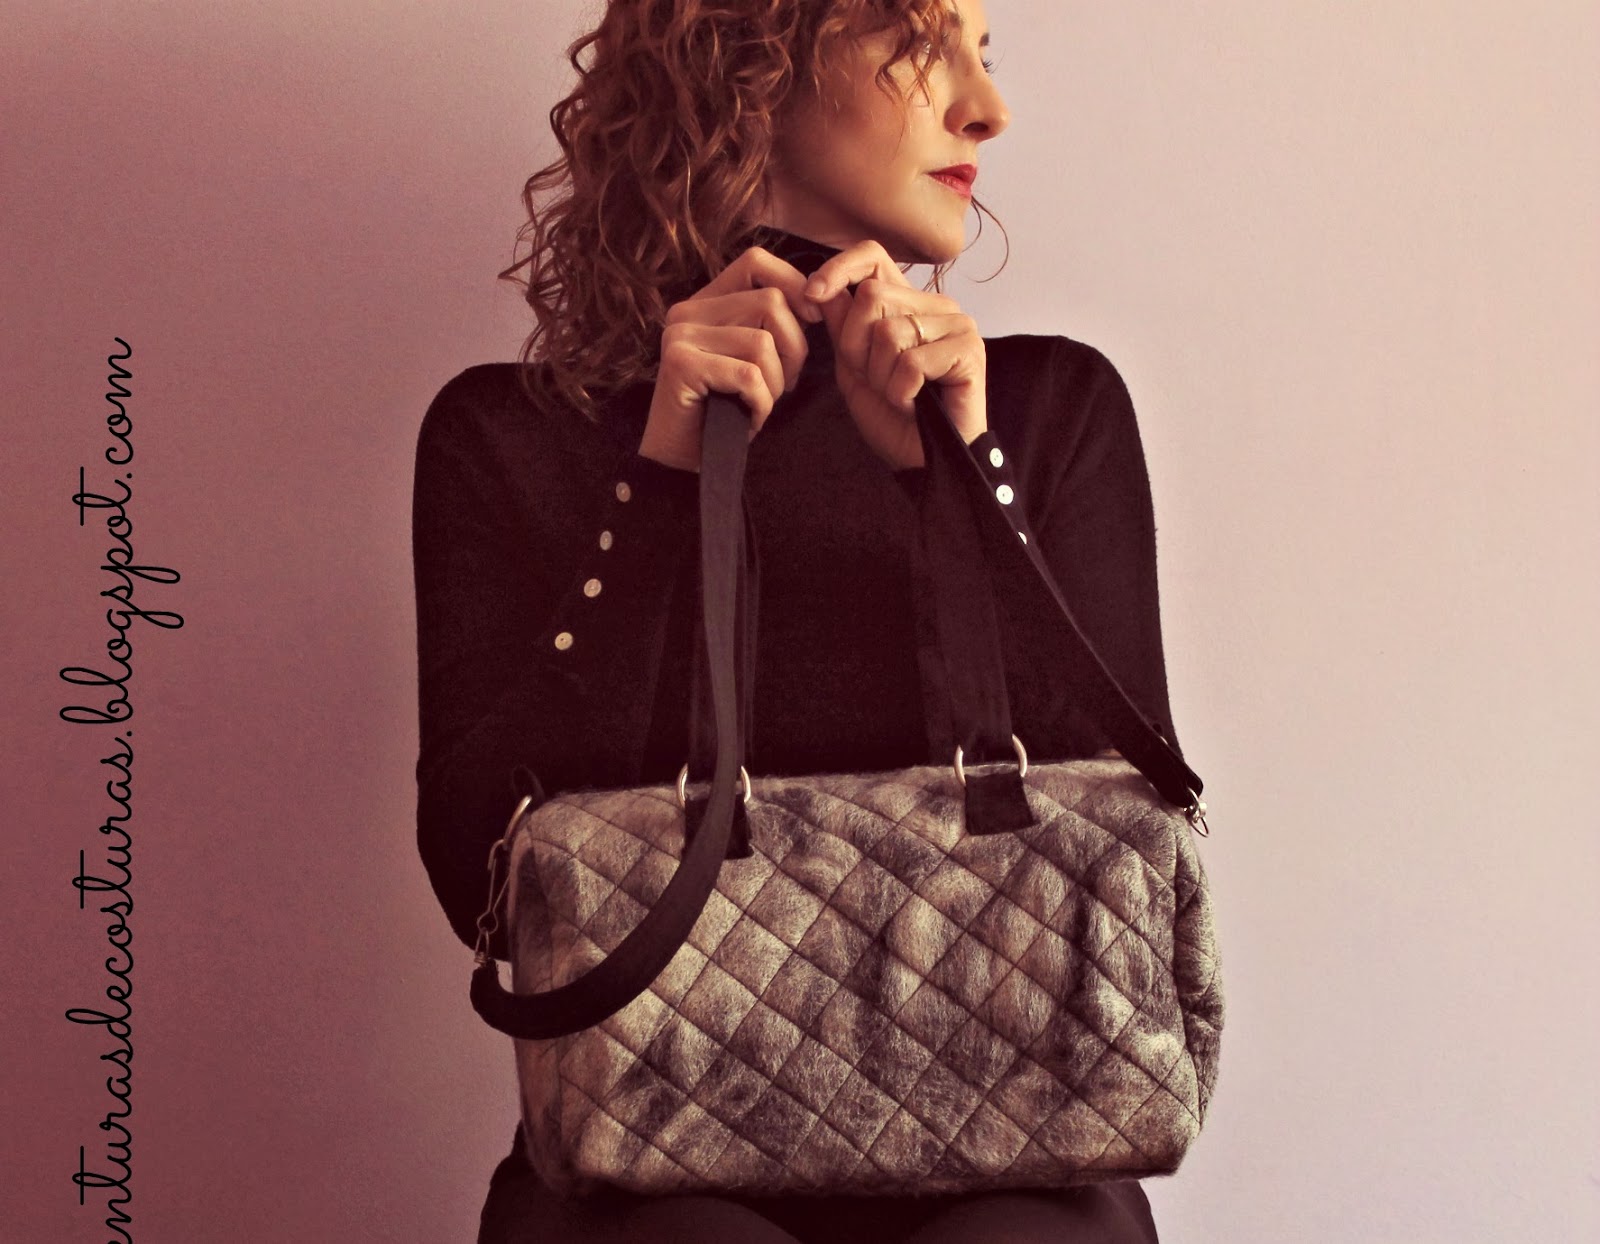
The Wool Bag. Bolso Calentito.


¡Hola, amiguitas! Cuanto tiempo ¿eh? Es que no llego nunca al RUMS , que le vamos a hacer...
He estado cosiendo, pero todavía no os lo puedo enseñar (¡Aaah, se siente! :) He seguido con el tema de los bañadores, pero no hay nada reseñable que enseñaros . Y tambien he cosido un bolso.
Necesito urgentemente una bolsa de deporte, mis hijos idem y ¿que me coso? Pues un bolso elegante y regio... Bueno, ha sido por practicar el guateado y eso. Será por excusas...

Y cuando encuentre las telas adecuadas haré las otras dos bolsas: La mediana para el gimnasio y la grande por si alguien me invita a un fin de semana en un "resort"  de lujo o similar. Será por pedir...

Hello friends! Long time no see! I´ve been sewing a lot, things that I cannot show you yet and I´ve also been working on my swimsuit, but nothing remarkable... And I sewed up a bag. I urgently need a sports bag, and so do my kids, and what do I make? an elegant bag!  Well, my excuse was learning how to quilt...

When I find the perfect fabric I will also make the other two bags: one for the gym and the other one for a hypothetical weekend in a luxirious spa or something... Dreaming is free, right? ;)

B5968
¡Hombre, no me digais! Es como para quererlos todos, ¿no?
La máxima dificultad ha sido encontrar los artículos metálicos Las argollas deberian haber sido rectangulares, y yo llevo de las de sujetar toldos ( lo que tienen en la ferretería) Y los mosquetones tambien bastorros, pero esa es la maravilla del DIY, te apañas con lo que tienes y consigues un resultado más o menos digno.

Aren´t they cute? The most difficult part was finding the "hardware" those D rings and the carabiner (?) I had to buy them in the hardware store, where they normally sell them for hanging the sunshades. That´s the beauty of the DIY, using what you can get to achieve decent results.

B5968

El guateado ha sido lo más engorroso (que no dificil, eh?) Si quereis probar y nunca lo habeis hecho yo os recomiendo el fantástico y clarísimo tutorial de LA MODISTA DE ATENEA a.k.a. Diana. Yo he usado la barra para acolchar que tiene mi máquina, pero el truco de la cinta de carrocero me parece genial. 

Quilting was the most tedious part, not difficult, though. There is a great tutorial from the lovely Diana of  LA MODISTA DE ATENEA. I used this little bar that came with the sewing machine, but the trick she uses is really clever


source

Aquí os dejo unos detalles del interior, las asas, el guateado...

Here are some details of the lining, the handles, the quilting...


Y la última foto innecesaria, como veis el bolso cae justo para darle culazos mientras caminas,¡menos mal que están las asas más cortitas!
¡Hasta más ver, hermosas!

And the last photo. As you can see the bag falls at the exact length to go bumping the bag with the hip as you walk. Something that I dislike a lot. But, the short handles are just fine!
See you really soon!


viernes, 7 de febrero de 2014

Beach Leotard / Malla de Playa

SOURCE


¿Sabiais que la gran Katharine Hepburn se daba baños de agua helada todos los dias? Y vivió muchos años.
Aquí en el Estrecho el agua esta fría. Fría de salir con rodetes rojos y blancos en la piel...Tiene que ser buenísimo para la circulación.
Así que hay que correr un buen rato antes de que te entren ganas de echarte a nadar. Con ese propósito (correr y nadar) he hecho esta maya de playa

Sometimes I don´t know how to call things: this, in my head, is a beach leotard, because I use it for training purposes when I go running and swimming on the beach. And , even though it is sunny here, it is also chilly, but they say swimming in cold water is good for your circulation... Katharine Hepburn used to do that every day and she lived very long years, right?


Todavía no tengo el "truqui" para coser bañadores, cosas como el largo de puntada exacto, pero será cuestión de practicar.

I´m not an expert  in this swimming-costume bussiness and I still haven´t got the secret to the exact stitch lenght and things like that, but I guess it is a matter of practice.


Este patrón también lo compré antes de que Maider nos enseñara a hacer leggings, para mi era un plus, lo que me llamó la atención fué la espalda de "nadadora" y que el patrón incluyese las instrucciones para hacer un "suje" incorporado...luego os lo enseño por dentro. 

I bought this pattern because of the race back and the shelf bra lining, and the leggings too!
I´ll show you the lining later...


KWIKSEW 2797
Tuve que hacer algunas alteraciones al patrón, como quitarle 4 cm de talle...debajo del ombligo, y la espalda lo mismo, claro.
Luego al verlo puesto me doy cuenta de que, visualmente el escote delante no está muy proporcionado, creo que debería ir más alto, y otra cosa que no me gusta es que aplasta demasiado el pecho...¡A ver! no me quejo, que de lo que se trata es de poder correr sin que se mueva, pero si alguien tiene alguna sugerencia :)

I had to alter the pattern, 3 inches less in the crotch area. I took them from the front and the back.
Now, looking at it on me I see that visually, the scooped neckline looks too low, like it is not in proportion...and also it flattens the chest so much...I´m not complaining, it doesn´t move when I run, which is the purpose of it, but wouldn´t it be nice that it also look good? Any suggestions?


Por dentro. La lycra que es gordita y de calidad me la mandó la incomparable Charo de Cosiendo y Aprendiendo, y el forro lo compré en Bilbao, en ESTE/THIS encuentro costurero. 

Inside: The fabric is a thick lycra that I love sent by my friend Charo of Cosiendo y Aprendiendo, and I bought the lining in Bilbao, while I was in ESTE/THIS meeting.


Pues eso es todo, chicas. A ver si con la práctica va mejorando la técnica.
¡Buen fin de semana!

And that´s all from me. Maybe with practice the technique would get better.
Happy weekend everyone!