Mostrando entradas con la etiqueta tutorial. Mostrar todas las entradas

viernes, 15 de noviembre de 2013

Mod Dress Tutorial Part 2

¿Seguimos?
Estabamos con el forro. Ya habíamos sacado la parte de arriba de la misma tela que el vestido. Vamos a sacar la de abajo con telita de forro, para que resbalen bien los leotardos.

Shall we continue?
We are dealing with the lining. The top part we had cut it in the same fabric as the dress. The lower part we make it in lining fabric.


Aqui falta una foto importante que no sé donde se ha metido: Alrededor de las sisas, hombros y cuellos del vestido le ponemos el VIVO, lo hilvanamos y entonces cosemos el forro.

A photo is missing here: We place the PIPING arround the armholes, shoulders and neckline of the dress, we baste it and then we stitch the lining.


Ahora cosemos las vistas de los bajos del vestido. Lo planchamos bien y le pulimos los cantos vivos. Después, a mano lo cosemos con puntadas escondidas para que no se note por el derecho.

Now we stitch the hem facings to the dress. After that we iron and finish the edges. Then we place the hem with hidden stitches (is that a sewing term?) 


Al dobladillo del forro con un "vuelta y vuelta" le vale.

The lining hem: Fold, fold, stitch!


¡Ya casi está!

Almost there!


Solo te queda colocar unos botones, snaps (de los normales o de los de martillazo) y ya lo tienes. Yo le he cosido automáticos (3 en cada lado) y los botones están ahi solo para hacer bonito.
Se que el tuto es un poco chapucilla pero no se donde se han ido las otras fotos. 
En fín. La próxima lo haré mejor.
¡A más ver, muchachitas!

To finish the dress you just need to choose the way you want to close the shoulders. You can choose regular buttons and buttonholes or, as in my case, three snaps on each shoulder and add the buttons as decoration.
I know this tuto is lacking a lot of photos but I honestly don´t know where there are!
I´ll do better next time!
See you soon!


Haciendo el Vestido Mod Dress Tutorial. Part 1

¡Buenaaaas! ¿Como llevais la semana? Yo liada, como todas vosotras, pero he podido sacar un ratito para preparar esta especie de tuto, por si alguna está interesada en hacer un vestido de este tipo.
Es muy sencillo y solo necesitais un patrón de vestido evasé con las medidas de la niña en cuestión.
Espejito tiene cientos de miles en todas las tallas. 
Este vestido va forrado y con vivo por todos lo sitios. El cierre lo hacemos en los hombros, así nos evitamos el engorro de cremalleras o cierres traseros
Vamos al lio.

Hello! How is the week going? At last I could find a little time to write this kind of tutorial, in case somebody is interested in making something similar.
All you need is an A- line pattern.
This dress is lined and has got piping everywhere. It is closed at the shoulders with snaps.


Lo primero desmontar el patrón:
Vamos  a hacer un monton de lineas:
1- en los centros verticales, con la mitad de la anchura de la banda central . En mi caso la banda quiero que mida 9 cm, para que me quepan 3 cochecitos, así que mido 4.5 cm.
2- otra banda horizontal con la misma medida.
3- Una linea un poco mas abajo de la linea de la sisa para hacer la parte de arriba del forro el forro.
Veis que en el dibujo hay dos lineas que parten de la sisa hacia abajo. No las tomeis en cuenta, es que no sabia que anchura darle abajo y estuve dandole vueltas.

First thing is trace tracing the lines of the dress on your pattern. 
We are going to draw a lot of lines:
1- At the centers a vertical line half the width of the contrasting band. In this case I want the band to be 9 cm wide so I measure 4.5 cm.
2- Two horizontal lines, 9 cm wide apart.
3- A line a bit under the armhole to make the upper part of the lining.
You can see in the pattern two different flare lines. Don´t mind about those. That´s me having doubts.


Una vez hecho esto, transladamos todos los patrones a otros papeles, añadiendo sus márgenes de costura.( a mi se me olvidó en los centros) 
Para las bandas no hace falta patron: solo cortar dos bandas una horizontal, otra vertical de 9 cm más los márgenes que suelas utilizar.
El patrón del forro aún sin cortar, Ese se corta en dos: parte de arriba hasta la sisa y luego la de abajo. Luego volvemos a ello.
Ah, y también saqué los patrones para las vistas del bajo.

Now we transfer all those lines to separate patterns and we add they corresponding seam allowances (I forgot to add the on the front but wrote me a little note not to forget!)
The white pattern in the photo is the one I used for the lining, and the little ones are for the hem facings.


Cortamos en la tela:
2 partes superiores delanteras
2 partes superiores traseras
2 partes inferiores delanteras 
2 partes inferiores traseras
En el doblez ponemos las partes de arriba del forro.
Separadamente cortamos las bandas de la tela de contraste (lo siento, de eso no hay foto, pero soy muy listucas así que seguro que no hay problemas)

On the main fabric we cut:
2 upper front parts
2 lower front parts
2 upper back parts
2 lower back parts
On the fold we place the front and back upper parts of the lining
Separately we cut the contrast fabric bands (I have to photos of that, but I guess you can figure that one out ;)


Y empezamos a coser. Primero ponemos el vivo, y lo sujetamos con alfileres. Luego un hilvan para que no se mueva. Lo demás lo explican las fotos:
And we start sewing. First we pin the piping, then baste so that it won´t move.
The next photos are self-explanatory.

Esto lo hacemos en las ocho piezas de fuera. 

We do this in the eight pieces 


Las bandas de los cochecitos, aqui irreconocibles por una capa de entretela. No cosemos hasta el borde para poder maniobrar a la hora de unirlo a las otras piezas.

This are my contrasting bands, that´s the back that I interfaced, to make stiffer. We don´t stitch all the way so that we can manoeuvre when we attach them to the other pieces 


La parte más trabajosa es unir nuestra cruz a las cuatro piezas delanteras y las 4 traseras.

This is the worst part: joining all the parts toguether. More basting!


Y no me da tiempo a más.
Mañana os cuento lo del forro y las terminaciones.
Si teneis alguna duda o pregunta, no lo dudeis ¿eh?
¡Besos!

And that´s all I can show you today. 
Tomorrow second part: lining and finish. 
If you have any doubt or question, don´t hesitate to ask!
See you!

martes, 24 de septiembre de 2013

Trick and Luck. Truco y Suerte.


¡Hola! Aqui vengo otra vez para contaros mi truco para coser los automáticos. Es una chorrada auténtica, pero quiero que penseis que yo he aprendido a coser de "aquella manera" y que lo que para otras personas puede ser de cajón, yo tardo más en darme cuenta. Espesa que es una. 
Al principio (además de espesa, cuadriculada) marcaba los emplazamientos del patrón e en mi inocencia pensaba que una vez cosida la prenda iban a coincidir. Claro, despues ni uno. Así que ahora uso esta, ajem, tecnica.
Primero coso la parte "macho" del automático, más o menos a las distancias que manda el patrón. Y después hago esto:

Hi! Here again. Just to tell you my trick to sew the snaps in their right place. It´s a no-brainer, really, but bear in mind I´m a self-taught seamtress and what seems obvious for some of you, for me it is like a ground-breaking discovery. Actually I´m quite square, I used to dutifully  mark the placements of the buttons, snaps etc, before starting to sew. Then, you know what happens: any uneveness results on a shift of things and then the little snaps won´t match. 
So what I do now is this. First I sew the studded part  to the garment as evenly as I can and following the instructions and then I do this:


Facil, ¿eh? Ahora tengo una pregunta para vosotras. Sabeis que hay algunos automáticos que están durillos para abrir y cerrar. Esos son los que primero se descosen.
Yo los coso de las siguiente manera:
Seis o siete puntadas en cada agujerito y luego al siguiente. Cuando termino con todos ya me vuelvo loca: puntadas y más puntadas con nudo incluido, al rededor de alguno de los agujeritos, y cuando ya estoy satisfecha, escondo el hilo y corto. 
Aún así se me descosen los duros. ¿Alguna sugerencia? ¿Pofiiii?

Easy, huh? now I´ve got a question for you: You know there are some snaps that are harder than others to open and close. Those are the ones that "un-sew" themselves no matter how securely you have attach them. 
I sew them like this:
Six or seven stitches around each little hole, then I cotinue to the next until I finish. Then I go crazy stitching and knottting and stitching again, until I think they will be safe, then I hide the thread and cut.

But still the tough ones always unsew themselves at some point. Any suggestions? 


Y ahora os cuento esta maravilla que me ha pasado, que de verdad os digo que a veces miro a mi marido con suspicacia:  Es que tengo una suerte que no me lo creo y ya se sabe "afortunado en el juego..."
Que me ha tocado, otra vez, un regalazo. En el sorteo que hizo UNA MODISTILLA DE PACOTILLA (a otra que le gustan las rimas, como a mí). Aka Alicia. Por favor pasaos por su blog, su ultima entrada se titula "Omá que fuerte" por que ha salido en el Burda la señorita. A mi con el título de la entrada me basta y me sobra pa quererla. Los blogs de costura me gustan casi todos, pero cuando encuetro uno donde encima me rio, ya me quedo fijo.
Bueno esto es lo que me ha mandado. He tenido que esconder la caja y todo su contenido porque mis hijos se querian hacer collares con los botones, pulseras con las cremalleras, el niño era más partidario de hacer un agujero, enterrarlo y marcar con una X, luego hacer un mapa...cada uno a lo suyo. Pero no. Este es el tesoro de la "mamma"

And now let me tell you about this wonderful thing that happened to me. I´m telling you sometimes I look at my husband askance... you know how the saying goes:" Lucky at gambling, unlucky in love" because, yet again I won a give away!!! Can you believe it? Well, here it is: A lot of buttons, and other assorted notions that are a treasure. My kids just wanted to take the whole loot and run away with it (necklaces, wristbands...an actual hole in the ground and then mark it with an X, so went the whispers) and I had to hide it. It came all the way from Barcelona. The lovely Alicia from UNA MODISTILLA DE PACOTILLA sent it to me and I´m so very, very grateful!


¡Ja! ¿Para muestra 17 botones? Las cremalleras se para que sirven, pero lo de la derecha me conturba y/o inquieta: Lo de abajo blanco es como una entretela fuerte, en rollo. Lo redondo es una cinta...¡made in Japan! no en China, nenas, no,no,no ¡en Japón! Me ha hecho mucha gracia.
Y lo demás son como pasamaneria. Fijaos en el negro: Es de bolitas, como un vivo a lo bestia. ¡Qué se yo la de cosas que voy a hacerme con esto!
Gracias Alicia, me has hecho muy feliz....¡Y ahora a comprar el cuponazo! 
¡Besos a todas! Y sed buenas. Aunque si sois malas, lo pasareis mejor ;)

Lots of love and good vibes to all of you. See you soon!

miércoles, 18 de septiembre de 2013

Flat Felled Seam. Costura Vaquera

¡Hola! María me preguntó hace un tiempito que como se hacian las costuras que usé en los Pantalones Cargo y que también he usado en la última chaqueta que he hecho. Creo que a las mias le faltan una costura más muy cerquita de la primera costura, pero bueno, así es como las hago yo. Lupe tiene un tuto de este mismo tipo de costura
Este Tutorial de Lupecienta: Costura Tejana falsa
Y en inglés están los tutoriales que os indico abajo para hacerla en recto, en curva y en el interior de una camisa, con su abertura de puño.
Ya sabeis que no soy mucho de estas entradas, básicamente porque se me olvida hacer fotos en el proceso de coser, pero alguna vez toca.

Hello! I´ve been asked how I finished the seams in the last jacket I made, and I guess that although there are a lot of great tutorials on how to make this flat fell seams like for example:
This one: Coletterie. On a straight seam
This one: Hand made by Carolyn. On a curved seam
This one: Also from Carolyn. Fla felled and a split.
Sometimes I have to make my small, tiny contribution, and probably, it´s not even right, but this is how I did it.


Bueno, pues eso. Una cosita que espero que pueda ayudar a alguien a terminar sus prendas más limpiamente, que fué una de las cosas que más me costó a mi.
Un beso y feliz semana.

Easy, huh? Well, it´s not perfect but if it helps somebody, I´ll be glad.
Happy week everyone!

martes, 18 de diciembre de 2012

Tutorial Cocoon

A esto le vamos a llamar "Cocoon" por que la traducción del termino no me parece seria.Tirando de diccionario
"Tutorial para hacer el Capullo" No,no,no...mejor Cocoon (suena cocún)

Ahora en serio, ¿Necesitais un regalín de último momento? ¿Algo que se pueda hacer en media hora? Pues aquí lo teneis. Y lo mejor es que si la receptora del regalo se aburre del modelo, basta quitar las pocas costuras que lleva para volver a tener 1 metro y cuarto, mas o menos, de tela intacta, para hacer otra cosa.

¿Más ventajas? Que como lleva tan pocas costuras, no necesitas máquina (aunque sí más tiempo para terminarlo)
-¿Se te ha ocurrido a ti sola?- Os preguntareis...pues claro que no, yo de imaginación ando floja. Se lo he copiado a mi admiradísima Shams de Communing With Fabric.No os perdais su blog,sus creaciones son impresionantes y es la "maga" de los pantalones. Podeis ver sus dos versiones del Cocoon Sweater y sus instrucciones (en pulgadas) en Este Post
Yo me limito a pasar sus medidas a centímetros.(Ya,ya, secándome los sudores, estoy, ji,ji)

We are having a bit of a joke here with the word Cocoon as the spanish translation sounds rude, so we are leaving it as it is. 


Now, Do you need to make a last minute present? Something you can sew up in less than half an hour? Here it is. And the best part is that if the recipient of the said present gets bored of it she´ll have more than a meter of almost intact fabric, to make a different thing. Another advantage: you don´t really need to use the sewing machine for it,you can make it by hand (but then you´ll need more time)


The idea is not mine, I´ve got it from my most admired Shams of Communing With Fabric , she makes all kind of funky clothes and her trousers are awesome. You can read her post with the instructions and her two versions of the Cocoon sweater HERE


I´ve only translated the measures from inches to centimeters, so if you allow me, from now on I´ll continue only in Spanish as the English instructions are in Sham´s Blog


cocoon 024
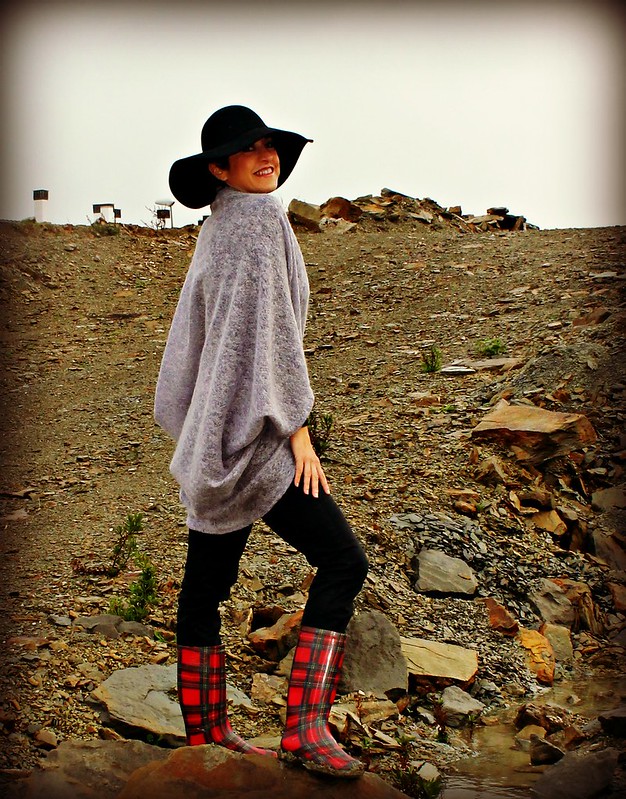
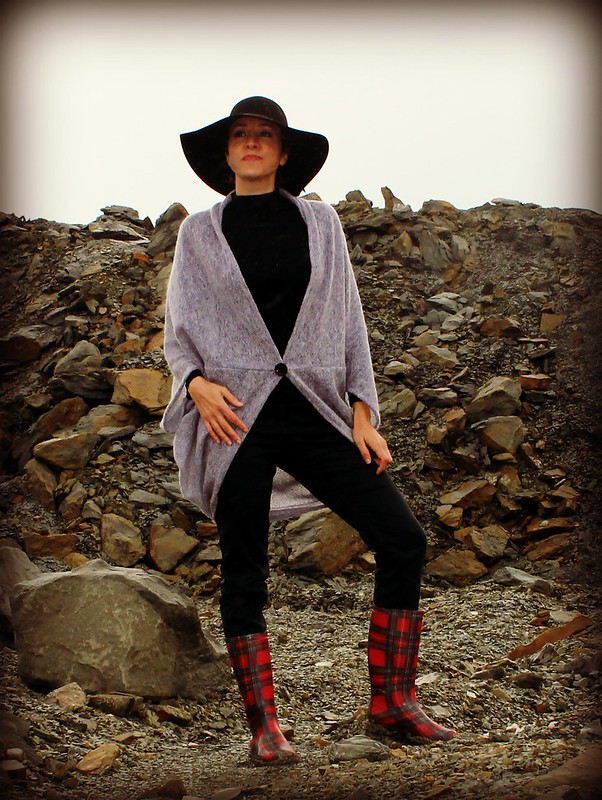
Con las katiuscas y el sombrero, arreglá pero informal.


cocoon 015


¿Que necesitamos?
Tela de jersey con buena caida. Yo he usado una que podría parecerse al famoso genero esponjoso de lana que dice el Burda. 
¿Cuanto?
Más o menos metro y cuarto. Se puede hacer con un metro, pero quedará más corto.
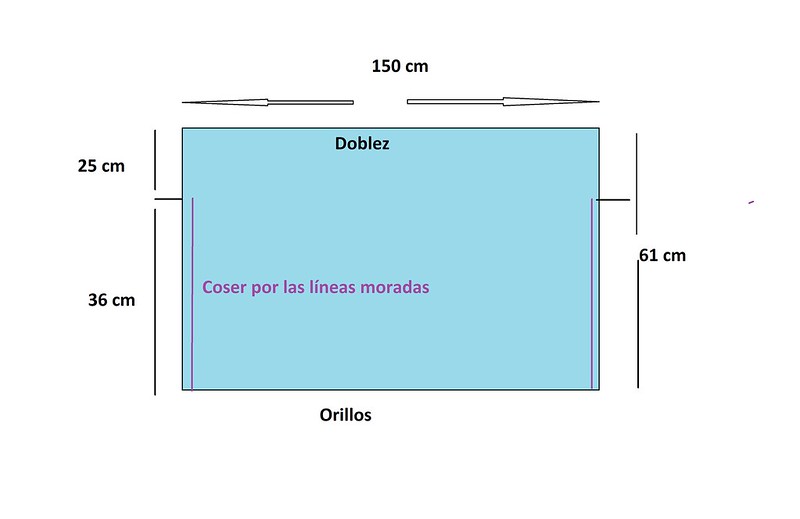
La anchura 150 cm. Si es menor a esto, resultará en "mangas" más cortas.

Basicamente hay que doblar la tela a lo ancho y coser por los bordes desde los orillos, dejando abierto antes de llegar al doblez unos centímetros para meter las manitas.
Las medidas que he puesto aquí son las "traducidas" de Shams, pero la abertura puede ser menor, la largura, la anchura....ya me entendeis: a vuestro gusto.
Sin título

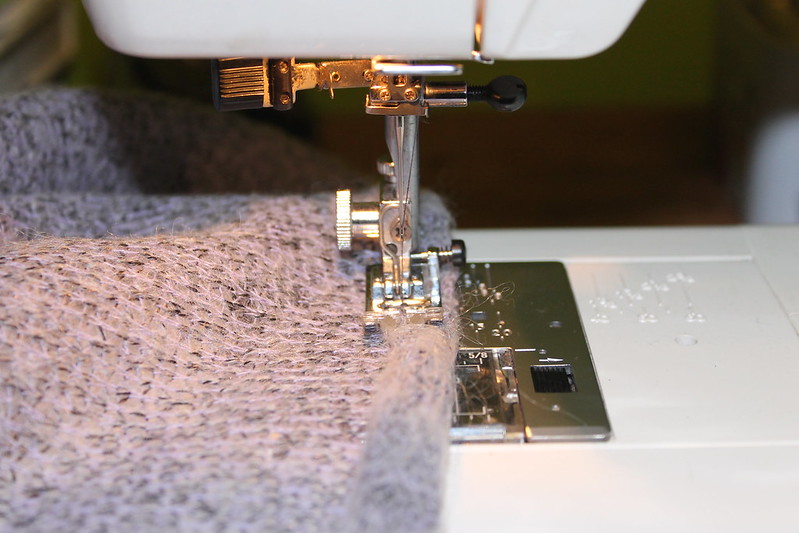
Una vez cosido solo hay que terminar los bordes con un dobladillo, y listo.


cocoon 005

Para cerrarlo se puede usar un alfiler bonito. Yo le he puesto un automático de los grandes, y he cosido un botón grande 


cocoon 036
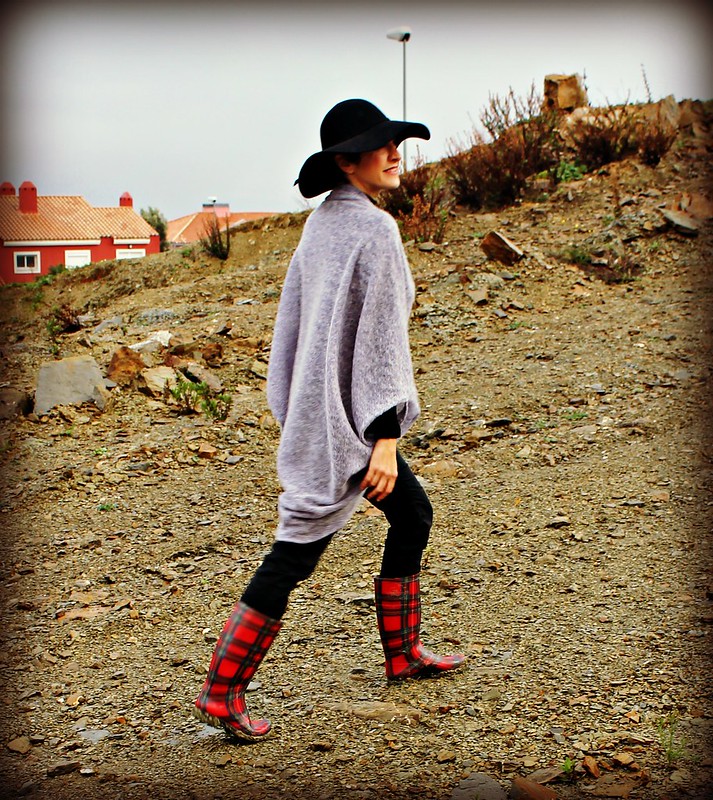
A saltar charcos
Muddy puddles, here I come!

sábado, 27 de octubre de 2012

Tapeta cuello Polo, paso a paso. How to make a polo placket


Para hacer la Camiseta de Alce las instrucciones del Burda, referentes a la tapeta polo, se volvieron indescifrables. Esto es lo que pude colegir de ellas más la ayuda de un libro en casa, la versión libre, vamos. Seguro que hay maneras mejores de hacerlo. Todo lo que puedo decir es que esta funcionó.

To make the Moose Top , Burda instructions became indecipherable when it came to the placket. This is what I could gather from them plus an old book help, and it turned out quite right. I bet there are other better ways to do it, all I can say is that this one worked

Esto es lo que te da el Burda: el patron de delante, con una guia de por donde hay que aplicar la tapeta (señalada con la flecha) La tela está cortada en el doblez. Y la tapeta, propiamente dicha.

This is what Burda gives you: the front pattern, cut on the fold, with the sewing line for the placket, and the placket pattern.


En lugar de cortar dos tapetas corté una sola, las medidas son de 12 X16 cm, una vez cortado.
Instead of cutting two plackets I made just the one, cutting on the fold .The measures are 4.7 X 6.3 inches. (I cut it a bit longer than the pattern) once  ir is cut and open.


Hay que poner entretela a la tapeta. Yo no deberia haberla puesto porque la tela es de lana y terminé con mucho "bulto". Marcamos el centro y dos lineas paralelas a 1cm que serán las lineas de aplicacion. También marcamos el tope de abajo.

You´ll need to interface the placket. I did and I shouldn´t have because the wool fabric plus the interfacing made this thing really bulky in the end. Then you make three lines: one in the middle,(that would be your cutting line) and two parallel lines 0.4 inches away from it (Stitching lines) Don´t forget to mark the bottom line too.


Ponemos la tapeta sobre el delantero, justo en el medio. Derecho con derecho.

We place the placket on the middle of the shirt front, right sides together.


Y cosemos por las lineas de afuera, teniendo cuidado abajo de que quede bien cuadradito.

You sew it then, following the sewing lines and making a neat square on the bottom.


Cortamos por la linea de el medio hasta 1 cm antes del tope. Entonces hacemos dos cortes hacia los extremos de las costuras de abajo, sin picarlas.
We cut along the cutting line. We stop 0.5 inches away from the bottom then slit it to the corners of the stitching (am I making sense?)


Damos la vuelta a la tapeta y la planchamos. Ahora tenemos esto:
Turn the placket to the inside and iron. It would look like this:

Derecho- Right side

Revés- Wrong side
Ahora ponemos uno de los lados hacia el otro y lo doblamos justo donde se encuentra con él
We take one part and put it on top of the other, and fold the former where it meets the latter.


Y doblamos el margen de costura y lo remetemos: tenemos un rollito de tela, vamos. Lo planchamos, hilvanamos y hacemos lo mismo con el otro lado. Cosemos  a lo largo.

Then we fold the seam allowance to meet the other on the same side and we match them. We have  a fabric roll, basically. Iron and pin or baste. Stitch along the" bulk "


Ahora tienes algo así por el derecho. 
Now you´ve got something like this on the right side


Elige que lado va a montar al otro, por que ahora toca fijarlo abajo con un pespunte
Now choose what side is going to overlap the other, because now we have to stitch it at the bottom 


Aún nos queda esta parte suelta
We still have this loose end dangling 

La flecha finita señala la costura para fijar la parte de abajo
La vertical el cuadrado+cruz para fijar lo lo que está suelto. 
La más grande señala como he terminado yo el cuello, con una cinta al bies, pero tambien está la opción de poner un cuello camisero.

The thin and small arrow points how I stitch the bottom
The almost-vertical arrow shows the square + X I stitched to fix the "dangling" part
The longer arrow points to the finish I chose, with bias tape, but you can also go and make a full shirt collar.
Con lo facil que hubiera sido cambiar el color de la flecha.
It would have been easier to change the arrow colour, duh!

Y no te olvides de los ojales ;D
Don´t forget the button holes! 

¡Espero que todo este rollo tenga algo de sentido! Hasta la próxima.
I hope this was not too boring and a bit helpful! See you!
viernes, 8 de junio de 2012

Como poner Bies con Cordón para principiantes. How to insert piping for beginners

Seguro que hay un montón de sitios donde puedes encontrar información sobre como poner el bies con cordón, pero el año pasado, cuando puse yo el primero, no encontré nada y me tuve que conformar con las instrucciones de Espejito Espejito:" Cose insertando el bies en la costura" ¡Maravilloso! Así que tuve que descoser más de una vez para que quedase bien.

Surely there are many places where you can find information about how to insert piping, but last year when I had to do it for the first time, I couldn´t find any, and I had to make do with the instructions in the magazine: "stitch both pieces inserting the piping". Great! So I had to rip the seams too many times to get it right

AVISO: esto es para PRINCIPIANTES, y es mi modo de hacerlo. Igual lo hace así todo el mundo, o lo estoy haciendo mal, pero a mi me funciona. POR FAVOR, si tienes otro método mejor, o sin tanto hilván, hazmelo saber.

Warning: This is for beginners, and my way to do it. Maybe everybody uses the same technique, or I´m doing it wrong, but it works for me. PLEASE, if you have a better way, or if yours doesn´t need so much basting, let me know.

El bies con cordón se puede hacer, pero yo prefiero comprarlo hecho de la mercería, que no sale nada caro y te quitas de problemas.

You can make your own piping, but I prefer the no-fuss version that you purchase in a notions store.

Esto lo he hecho con el modelo 145 Burda 05/2012, que pide que la parte de abajo de la parte delantera se frunza. Yo le voy a hacer unos pliegues.

I made this with model 145 from Burda 05/2012. In the front (not in the yoke) you have to gather the fabric, but I´m going to pleat that part instead.


1- En el DERECHO de la tela, a la cual ya habrás marcado el margen de costura, coloca el bies de modo que el cordón sobresalga del margen solo la anchura del cordón, y fíjalo con alfileres
1- On the right side of the fabric, mark the seam allowance. Put the bias so that the cord protrudes, and pin it
2-Pasa un hilván
2- Baste it
3-A la pieza que vas a unir, despues de marcarla, pasa los hilos para fruncir, pero aún no lo frunzas. Si le vas a hacer pliegues marcaselos. En mi caso es facil con las rayas. Vete uniendo drecho con derecho dejando el cordón fuera, pero prendiendo el bies y poniendo alfileres por ambos lados hasta que llegues a las marcas de fruncir
3-If you are going to gather the other piece, baste it but don´t gather yet. If you are going to pleat it, mark it. Start pinning from the sides until you get to the gathering marks. You are doing this with right sides together and leaving the cord out of it, just the bias

4-Ahora frunce la tela o hazle los pliegues y prendelo
4- Now it´s the time for gathering or pleating, adjust the length and finish you pinning
5-Pasamos otro hilván intentando llegar lo mas cerca del cordón sin prenderlo
5- We baste againg the whole thing, basting as close to the cord as you can
Ahí lo tienes: Bocadillo de bies.
There you go: a bias sandwich
6-Ahora, con el pie de coser las cremalleras, coloca las telas de modo que el cordón quede bien cerquita de la puntada, con el dedo guíalas para que el cordón siempre esté a esa altura. Si tu máquina tiene un botón para mover la aguja hacia los lados, usalo. (Con puntada recta, en mi máquina se mueve si le das al ancho de puntada zig zag un par de veces)
6-Now, with the zipper foot, the pieces in a way that the cord is really close to you stitch, and use your finger to guide the fabric. With some sewing machines you can move the needle slightly to the sides, you can use it to be more accurate in your stitching 

¡Y ya tienes un vivo estupendo!
And voilá!